
Customising Document Templates
On first use, after activating GA4, only your Company name will be set in the header area.
You will also want to add additional information, such as your company address and contact information.
You can add your own letterhead within Garage Assistant very easily, please have a read through the following information for different types of letterheads which can be setup to make sure that you get the best out of your GA4 system.
A letterhead makes a professional statement about your business. First impressions do count so make them work to your advantage, the more effort that goes into the image of your business the more you will get out of it.
To get started, go to the admin area > Customisation > Doc Template Settings
Document Template Layout
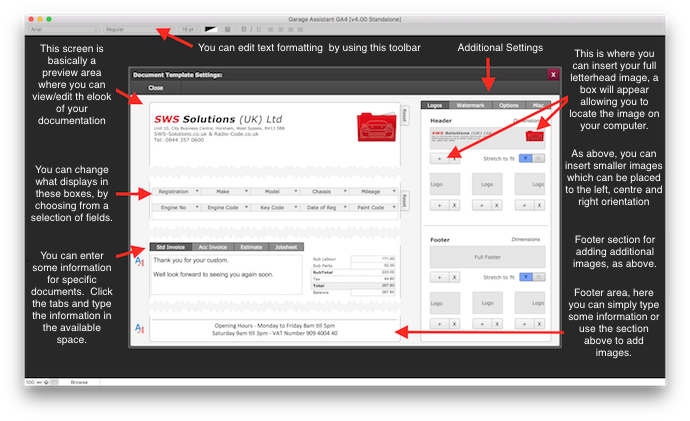
The image below shows you the document template area where you will be in order to make changes to the look of your documentation with GA4. The area is easy to follow and images are easily entered. See the image for some key areas;
Inserting Images
Go to the admin area > Customisation > Doc Template Settings
If you have a full letterhead then you will want to insert this image at the top right-hand side of the screen, you can either click within the "Full Header" grey bar or click on the + button. A window will appear allowing you to locate the image file on your computer.
Alternatively, if you have a smaller image or multiple images you can insert these as above, all you need to do is decide the orientation of your images and insert via the corresponding section, as shown in the image above.
You can also insert footer images in the same way.
Adding And Editing Text Fields
You can insert header and footer details directly into the preview area by simply typing the required information such as;
- Address
- Telephone Numbers
- Fax Numbers
- Email Address
- Website
- VAT Number
- Opening Hours
Please note that when editing the letterhead you cannot change the company name as this is linked to your activation for security reasons.
Text can be styled and edited to your personal preference by using the toolbar at the top of the screen, from this toolbar you can edit the following;
- Font Type
- Text Size
- Text Colour
- Text Background Colour
- Bold
- Italic
- Underline
- Text Alignment
When using a smaller image (not a full letterhead/footer image) text can be shown as well.
Customising The Information Shown
On the document layout screen you can change what information is shown on a document once printed. The selection of information which can be selected are as follows;
|
|
|
|
|
|
|
|
|
|
|
|
|
|
|
|
|
|
|
|
|
|
|
|
Specific Types Of Documents Options
To add additional information you can type directly into the main screen within the text fields available. There is a text box next to the payment totals which relates to specific documents;
- Standard Invoices
- Account Invoices
- Estimates
- Job Sheets
Within these boxes, you can set up information for each type individually so when printing the corresponding text will appear.
Customising further
From the tabs towards the top right of the Doc Template Settings page, you will find a host of additional options and customisation features.
Watermark
A watermark can be added, which prints behind a document's main content. For this, it is best if your image is already faded in a way that it's suitable as a watermark, however even if its not you can make use of the Fade Image % option. It's worth noting that using this option will disable the watermark on PDF's due to how it functions.
Options
The options tab enables you to make some minor adjustments to the print layouts, these include:
- Blank header/footer for printed docs: This removes the header section, for use with custom stationery.
- Dividers: Show or hide section dividers
- A toggle between one or two rows for heading information (Reg / Make Model etc)
- Offsetting the customer address, useful when using windowed envelopes.
- Toggle the print order of labour & parts to parts & labour
- Include advisories on the same page or a new page.
- Show or hide a "paid in full stamp" where relevant.
- Push totals to the bottom of the page, instead of them floating beneath the last line item.
Misc
The misc tab allows you to individually change section headers for printed documents, such as Labour, Parts and Advisories. By default, they all use the same grey colour.
You can select a custom colour for the four main document types, depending on the colour chosen, the text colour within that section should adjust automatically to remain visible.
Here you can also toggle the display of certain information for the main document types. This allows you, for instance, to remove the customer's phone number from invoices, whilst retaining it on Job sheets.
Tags: Headers, Header, Logo, Logos, Letterhead
Print Back to other articles