
Scheduling Appointments
GA3 allows you to schedule appointments throughout a series of work bays with colour coded job types for ease of viewing.
Simply click and drag between the required start and end time to add a new appointment.
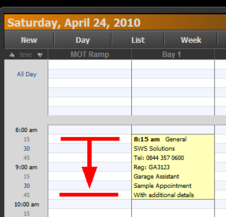
You will then be presented with the appointment screen, here you can enter as much or as little information as required.
An appointment can exist with no customer / vehicle or details other than a start date.
If you add a vehicle or a customer, you can re-use this information to create a document directly from the appointment.
By clicking on the top row of the appointment you will be asked if you would like to Edit the appointment or Create a new document.
If you select create a new document, you will be presented with a choice of document such as :
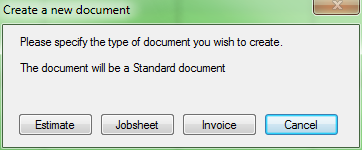
Once you make your selection, a new document will be created and any details such as the customers name and address will be automatically entered in to the relevant fields.
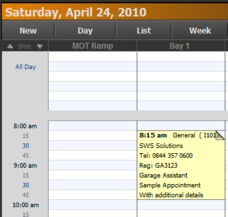
The document will also be automatically linked back to the scheduler listing so you can quickly find the corresponding document when required.
This is indicated by adding a 'turned corner' to the top right of the appointment.
Clicking on the top row of a linked appointment, will ask you if you would like to edit the appointment, or view the document.
Further Information / tips
You can also modify the times allocated to an appointment, by dragging to the new desired time.
You must however drag from either the top or the bottom line of the appointment.
You can drag an appointment to another bay, by dragging from any line of the appointment, to the new bay. Wherever you drop it, this will become the new start time. The duration wont change so the end time will adjust itself.
You can drag an appointment to a new time in the same bay, however for this you need to hold down the SHIFT key..
You can copy an appointment from one bay to another by holding down CTRL whilst dragging it.
You can create a new appointment using details from an estimate (this is not available for jobsheets or invoices)
Appointments without a start and end time will show in the upper section / all day view. You can drag and drop the grey bar to shrink and expand this as needed.
Dragging an appointment to the all day section will remove the start / end time.
Dragging an appointment from the all day section will only assign a start time, you can then drag to expand this to your desired end time, or edit the appointment.
To the right hand side, under the time, the options for Bays / Status will show you 4 settings at the bottom.
Refresh int, is the interval at which the calendar will refresh (this is for network versions only) and can be set to how ever many seconds you require, but setting this to anything under 15 seconds is not a good idea.
Sync Times means any documents linked to the appointment will have the start and end time kept in sync, so if you change the appointment, the document will change (end time being due by time)
Earliest time (self explanatory) allows you to change the first time shown on the calendar.. this will reset when you leave the calendar page.
Time scale (again self explanatory) will not reset when you leave the calendar.
The week and month views also allow drag and drop to move / copy appointments, however the times should remain the same as they where originally set, this time only the dates will change.
Available Options
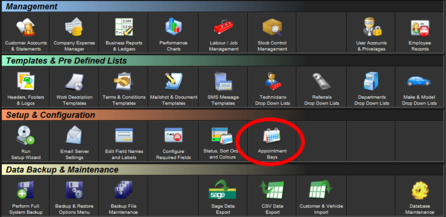
You can alter various elements of the Calendar, this section allows you to add as many appointment bays as you require, or rename those pre-set when installing Garage Assistant
These options are available by going to
1. Admin
2. Appointment Bays
You can specify your own display order against each appointment, allowing you to show MOT's for instance as the first column, then various technicians in any order.
Print Back to other articles